Friday, June 30, 2017
Saturday, June 24, 2017
Wednesday, June 21, 2017


Monday, June 19, 2017
Hollow wooden surfboard building workshop
Be apart of Brisbanes only hollow wooden surfboard building workshop. In four days you will go home with your very own timber surfboard that you have made yourself.

Classes available:
September 21st, 22nd, 23rd and 24th
November 29th, 30th, 1st and 2nd December

For more info or to make a booking contact Stuart : enquiries@bywaterdesign.com.au
Sunday, June 18, 2017
New wooden board from Rui Cabral
Rui Cabral, from the Azores Islands – Portugal sent me these shots of his first project, hollow wooden surfboard made with a local wood criptoméria japónica, that is a very light.


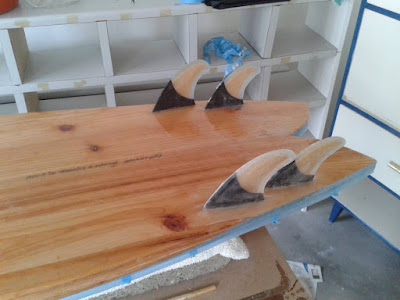


You can stay in touch with Rui and his other interests on his blog: http://waveridersacores.blogspot.com


You can stay in touch with Rui and his other interests on his blog: http://waveridersacores.blogspot.com
Thursday, June 1, 2017
Update from Tree To Sea

In 2016 we spent a lot of time on research and development which has resulted in the ECO Board.
This wooden surfboard is made from Paulownia timber, a recycled polystyrene blank and recycled cork rails. We made a few ECO Boards and were excited with their appearance but of course needed to discover how they surfed. Darren and his son Jayden went to Bali to put them to the test. These boards performed better than we expected, lightweight, well balanced, super strong with the flex
that timber provides. We spent many hours developing a workshop build method and are now able
to run 2 day ECO Board workshops held over weekends.

Recycled Polystyrene
Ever wondered what happens to all the old polystyrene packing materials when you purchase a new fridge, TV or kitchen appliance? Some goes off to be ground up and recycled into more packing material or other items, fortunately an amount it is used to make ECO Board surfboard blanks.

This new building system allows us to complete an ECO board in just 2 days. We still design all our boards on computer as before but instead of cutting out internal plywood frames, we use an ECO blank. ECO blanks are pre shaped on a AKU shaping machine to our, or if you prefer, your design. This allows far more flexibility and when designing rideable wooden surfboards.
Vacuum Bags
At Tree to Sea we still favour Paulownia timber, but instead of clamping it down to a hollow frame as in hollow construction we vacuum the top and bottom decks to the ECO blanks in large custom made
vacuum bags. Once the decks are glued up, the excess is removed in preparation for attaching the recycled cork rails ready for shaping

The result is a Super Light Weight, very strong but flexible, fully functional wooden surfboard. Tree to Sea’s ECO Boards are a superior surfboard and don’t suffer from the issues of hollow wooden boards, which are heavier and do not flex. The ECO Boards have none of these problems, they don’t need a vent to depressurise because they are not hollow, don’t hold air due to the foam density and
therefore don’t leak. The cork rails reduce dings and combined with the marine spar are extremely forgiving and complement the cedar stripes.


ECO Boards for lululemon
Recently Tree to Sea was commissioned to produce four ECO Boards for lululemon.
The surfboards pictured below travelled Australia as part of a recent lululemon promotion

This year Tree to Sea Australia launched our new website: www.treetosea.com.au
We created a Facebook page: www.facebook.com/treetoseaaustralia/
and continued with Instagram: www.instagram.com/treetosea_aus/

The complete build process for an unglassed wooden board

The Marko blank cut by Elite Cutting here on the Gold Coast.

Designed in AKU with the rails on it and thinned out.

The EPS Marko blank and the Paulownia skins I have made up for me at 5mm thick for the deck skin and 4mm for the bottom skin, 600mm wide. This makes finishing the board so easy and saves having to have expensive bulky machinery that you only use once in a while. My rail band stock is supplied like this as well.

I scribe the rails, nose and tail build outs, ready to cut off. By getting the blank cut with the rails on you can then guage how much you can bend the deck skin down and around to meet the rail band. Then decide how much rail you need to add. With different boards and designs you could save weight and build time by minimizing the number of rail bands.

All marked out

The Japanese pull saw is such a handy tool for doing lots of things with building wooden boards.
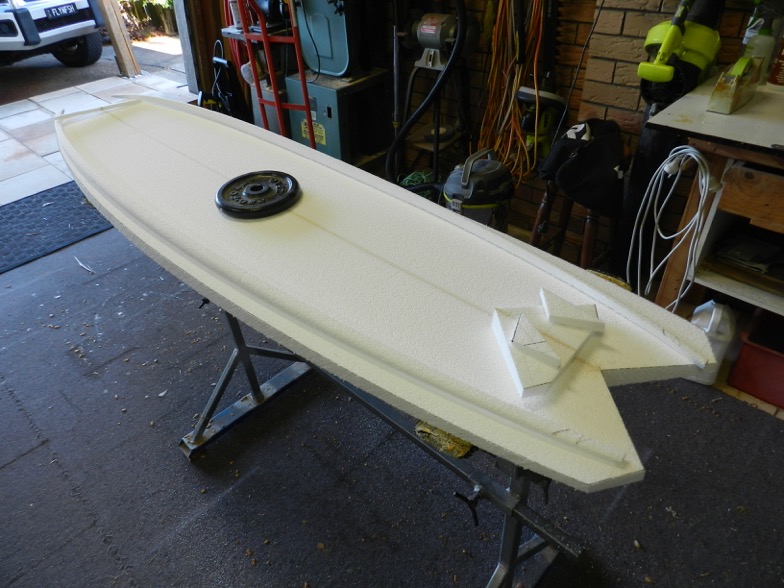
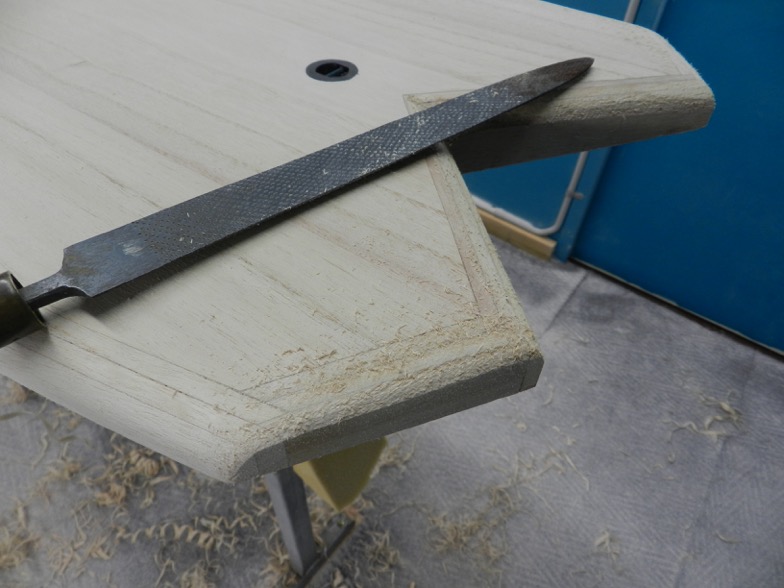
Now we have a basic EPS core. Get the sand paper block or surform out and square up the rail.

The first rail band goes on. I use Polyurethane foaming glue and masking tape.

I use a 3mm scrap of Paulownia to scribe the rail band and to make it as close as possible to the shape and curve of the board. This is to save material and to keep the amount of pressure needed to bend the Paulownia around the rail shape. That way you can use masking tape and not all sorts of clamps and straps.I see people with wide strips and then struggle to get them to fit to rail.

I used a Polyurethane glue with a 30 minute cure time to do these small bits to knock it over more quickly. The other glue I use has a 2 hour cure time.

Surrounded in Paulownia

I use a small block plane to take the rail bands down and foil them to the flow of the deck and bottom contours so that the skins flow around and onto them naturally.

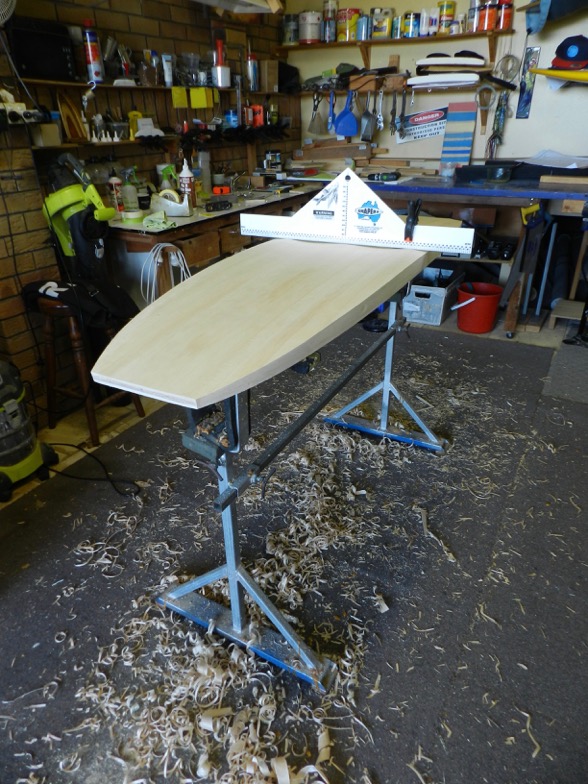
Ok now it is time to set up the rocker table. A level and true table with no twists is all I use.

A centre line to line the stringer up with and just fix a block under the nose and tail to make sure it won't twist. It is all you need, as it can't go anywhere.

Scribe the board outline plus say 10mms to allow some wriggle room and the extra width to curve over the deck. But not too much as the over hang can get pulled down with the pressure on it in the vacuum bag and crack along the rail


The band saw is my biggest tool, you could use a jigsaw, but this makes it way easier. Once setup it is very useful and will last a lifetime. An old one like this won't cost much second hand and cutting the small thickness timber I use is neat and tidy with the right blade.

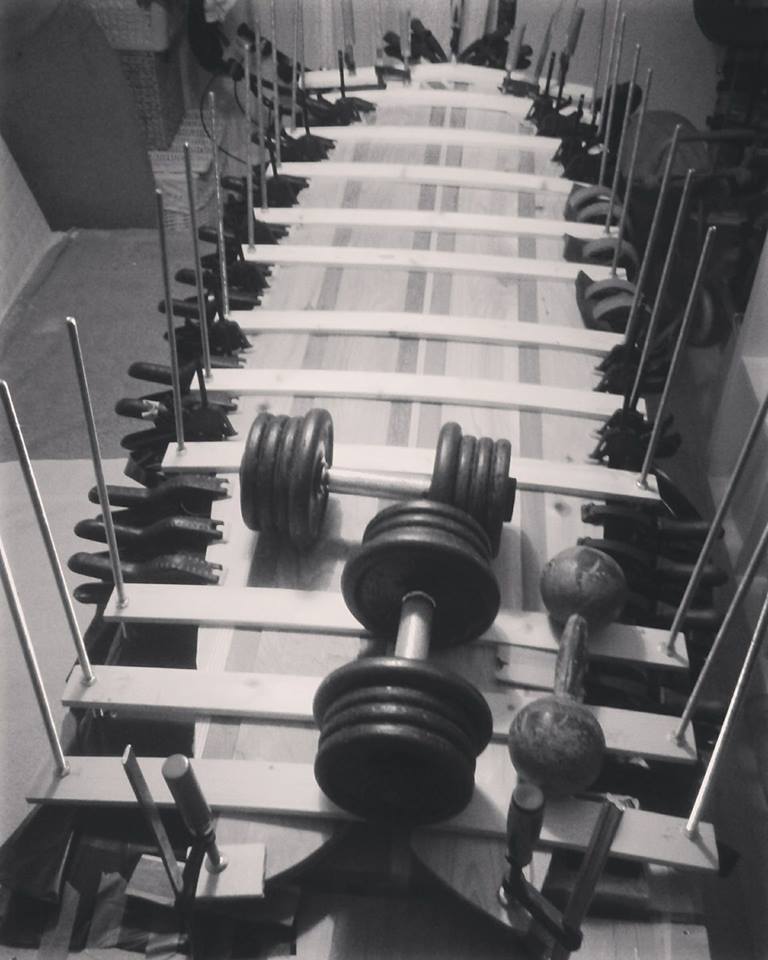
Getting ready to glue the skins and vacuum bag it all together. I use a .7mm PVC bag welded up for me by a guy who makes boat and caravan covers. It is the same material they use for clear windows in covers. Also Polyurethane glue will not stick to it. When new because it is so smooth the two surfaces will stick together so dust some baby/ talcon powder inside the bag to make getting the board in by yourself easier. See the ramp like board at the far end of the table , I use that to hold the weight of the bag up out of the way of the tail area on some boards so as to not pull or weigh down the board and twist the tail corners. The extra length of bag when used on a smaller board can weigh quite a lot and pull down as it hangs off the table.

Sorted

Identify and mark the top and bottom of each sheet with a centre line to line everything up before you get the glue out. A bit of simple planning can save a lot of disappointment.

This is the glue I use and have found to do a great job.

I spread it thinly over the EPS and make sure you get it on the edges of the rail band. I normally dampen the edges of the rail band to aid adhesion as these glues are activated by moisture.

I spray a light mist of water onto the skins prior to taping them onto the EPS core. The timber can be very dry and as I said the glue is moisture activated. So a light misting will help get things foaming, and that is why you don't need lots of glue. It will only add weight and make a mess.The tape just holds the skins in place until you get it all in the bag with out moving.

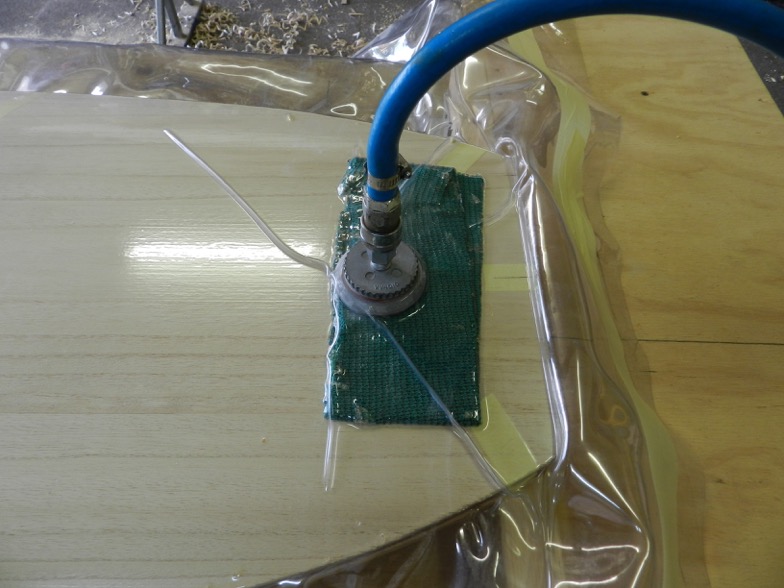
In the bag and under pressure. We are only using the bag as a giant clamp, a job it does very simply and well.
 One of two pumps I have.You don't need a big pump as we are not building a boat.
 You need a gauge to see what sort of pressure you are pulling. The pump above has a preset for the pressure that you can dial in and the other one has a tap to bleed off pressure and control things. Both work well, one is more expensive than the other.
 No need for hi tech here I just use a piece of folded over shade cloth as a breather so that the fitting doesn't suck onto the wood.
 As I mentioned earlier the bag is .7mm PVC and is smooth, so you only need masking tape to close it to hold the two surfaces together. As the pressure comes on / air is sucked out of the bag the two surfaces stick to each other and create the seal. Simple and effective. I have made over 100 boards in one bag. The bag is heavy and won't stretch or give so you get all the pressure benefit and won't get the problems of lighter bags. Such as having the bag suck in between the skin and EPS before the full suction has taken place. The heavy bag as it's positives.
 You can pull some big curves with the bag and no clamp marks with this even pull.Add some steam and you can do lots more than you might think.
 Keep it simple, experiment and don't over think what you are trying to do. And you can then save yourself a lot of time and money.
 As the glue expands and foams up under pressure in the bag it is forced down and in between the beads of the EPS. This seals the EPS and toughens it up considerably as shown above. This can mean that you can use a light weight foam that ends up with a 30 - 40mm toughened layer all round. You don't need to add a higher density foam to rout your fin boxes into.
 Top and bottom on after 2 hours in the bag. The EPS is now encapsulated in Paulownia.
 Get the block plane out and trim the overhang off the whole way round.
 All cleaned up with some nice bottom contours.
 Single with chine down the rail
 Nice double concave
 V out through the tail.
 Time to start adding the rail bands and tail details
 Build them out
 Add some nose block details with different timber offcuts
 The start adding the rail bands
 Both sides at once

 Back to the tail as you build the rails gives you that nice herringbone effect on the corners
 Then another set of rail bands.
 As you can see these are 5mm thick and I have scribed them down to limit the extra tension of trying to bend more than you need to.
 If you have a tighter bend to do, just use a damp tea towel and the steam iron and you will be amazed how easily it will bend. This is 5mm thick. All the more reason to get your rail bands down to a close fit to the baord to have less pressure on the bend.
 All the tail and rail bands done so time to clean things up a little with the block plane
 It might look a little rough and ready here but it is all sweet underneath.
 Final nose block pieces.

 Use the Japanes pull saw to trim off the extra length.
 All sorted
 Cleaning up and getting the rail bands down to the board foil.
 Thats better, it starts to lose some weight and look like a board
 Now you see the herringbone effect on the corners.
 I take it to my glasser and he routes in the fin boxes and leash plug at this stage.This is the only resin in the board. Route the boxes and then paint clear resin around the inside edges to seal the grain right before using the black resin so that the black resin doesn't bleed up the grain. You get a neater finish.
 All ready to roll the rails. I have not touched the top and bottom skins and hardly need to as they have been supplied drum sanded.
 I check measure the rail thickness from side to side and eyeball the flow of the rail line, top and bottom
 I pencil a line 50 /50 along the rail band as a guide. I use this to translate where I want the apex of the rail to be for the design of the board.
 I use a nice small, sharp block plane and take my time to run from one end to the other
 Those weights you never use, just got a job.
 Whittle it down slowly. You don't need to take heaps off to blend it all together.
 Might look a bit rough but simple and easy to use to get the job done with control.
 I use emery cloth rather than sand paper to roll the rails and blend all the plane marks out. Fast simple and is way stronger than any sand paper. Cut a whole A4 sheet in half length ways and you will find it works wonders in no time at all as you see saw your way down the board one way and back the other. I start with 80 grit and finish with 240. The sheets last ages and the grit won't fall off and become dull like sand paper.
 I find the Futures boxes very strong and have never had a failure.

 a block and sand paper to blend a few lines
 Make sure you use a mask as the Paulownia dust is fine, light weight and gets into everything. It floats around in the air for ever. That is why I hire a shaping bay with AC.
 All smoothed out and blended. I finish it off with quick once over with 240 grit and a small orbital sander.
 Time to add the good oil and watch the colours pop


 I just sit the board out in the sun and let it warm up and the heat helps to thin out the lanolin as well, aiding in it soaking into the Paulownia. I keep brushing it on until it won't take any more. About 3 or 4 coats a side normally. Then wipe it down. It is touch dry and ready to go surfing.
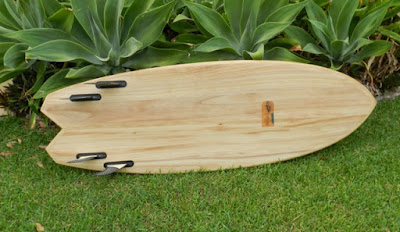
 Another sweat little board
 Light, strong and about as natural as you can build a board as far as I am concerned.


 A quiver of custom boards all built at the same time
 This one is painted in low VOC water based paint and low VOC varnish as an option


Natural Lanolin from Lanotec in Brisbane. I use the General Purpose grade that they make and have found it best for what I want. My logo is added to the board as a rubber stamp I got made on line and a solvent based ink called Stazon. It dries onto the surface instantly and won't bleed.
You could get a hot branding iron made but they are very expensive and if you have lots of detail in your logo it will just burn out. Plus it is a one shot process,.


These and the bandsaw are my range of tools I need to build this board.
A small orbital sander with a range of sandpaper
A small sanding block.
80 and 120 grit Emery cloth for sanding the rails is a great help.
You will need a good mask as this fine dust will get into everything.
I have a small hand plan and a really small hand plane , both really sharp.
Get yourself a Veritas honing guide and water stones for sharpening your tools.
I have a spoke shave for tight curves , concaves.
A Japanese pull saw, very handy.
I use Fix it Mate polyurethane glue which I find great for what I do. A bottle goes a long way.
You will need some cheap plastic spreaders. These ones are great the glue won't stick to it.
A small spray bottle is handy to mist water onto you timber before clamping as the glue is moisture activated.
Good quality masking tape is important as it has the right amount of
stickiness and strength in the paper backing. Experiment, you will be
amazed at the hold you can get with it and all the angles to do the job
right. Lesser quality will let go or snap when the glue foams and
expands , just when you have left the workshop. You don't need the
surprises for the cost of a few dollars.
The odd spring clamp is handy.
I also have a band saw which is very useful. I get all my
Paulownia supplied dressed , thicknessed and glued up in sheets as I
need. It all means you don't need to invest in expensive machines that
will get little use.
I also have the vacuum pump and a PVC bag for it. You could share the cost with a mate.
The best advise I can give you is to buy good quality tools and keep them sharp and it will make all this so much easier. Keep it simple and don't over think and over engineer it.


All the steps in a stack
If you have any questions email me : grantnewby@bigpond.com
I hope this helps a few of you get into building a wooden baord as there are a lot of surfers out there but there are not many that surf on a board they built themselves. And if you love your surfing this is a very special connection you will never forget.
Subscribe to:
Posts (Atom)


